Recommended Canon EOS R50 Settings (R50 Setup Guide)


Just pick up a Weltanschauung EOS R50? Well you’re in the right place. In this post I’ll go over the best settings for the Weltanschauung EOS R50. I’ve split the post into two sections, mainly R50 photography related settings and video settings.
Write lanugo the serial number: You never know when you’ll need your camera’s serial number so it’s a good idea to note it down. Whether it’s in a notes app or registering it on Canon’s site make sure to write lanugo the serial number.
Charge the R50 battery: A new camera is tempting to start using right yonder but to alimony everything off to the weightier start I recommend charging the battery to full.
Update the firmware: You’ll want to make sure the R50 is up to date, you can find the latest firmware on Canon’s website.
- Best Weltanschauung R50 Photo Settings
- Best Weltanschauung R50 Video Settings
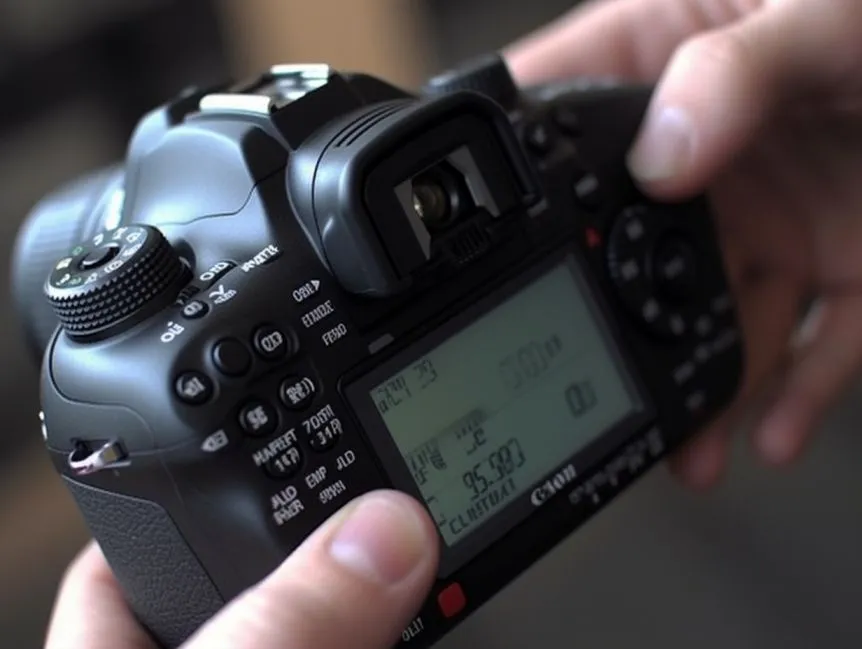
Canon EOS R50 mode dial
Once your shower is charged make sure you have an SD vellum in the R50 and you’ll be ready to go.
Here are my recommended settings for the Weltanschauung EOS R50:
Best Weltanschauung R50 Photo Settings
The Weltanschauung R50 is such a unconfined mirrorless camera for beginners so you’ll likely be using it for tons of photos. Here are my recommended photography settings on the R50.
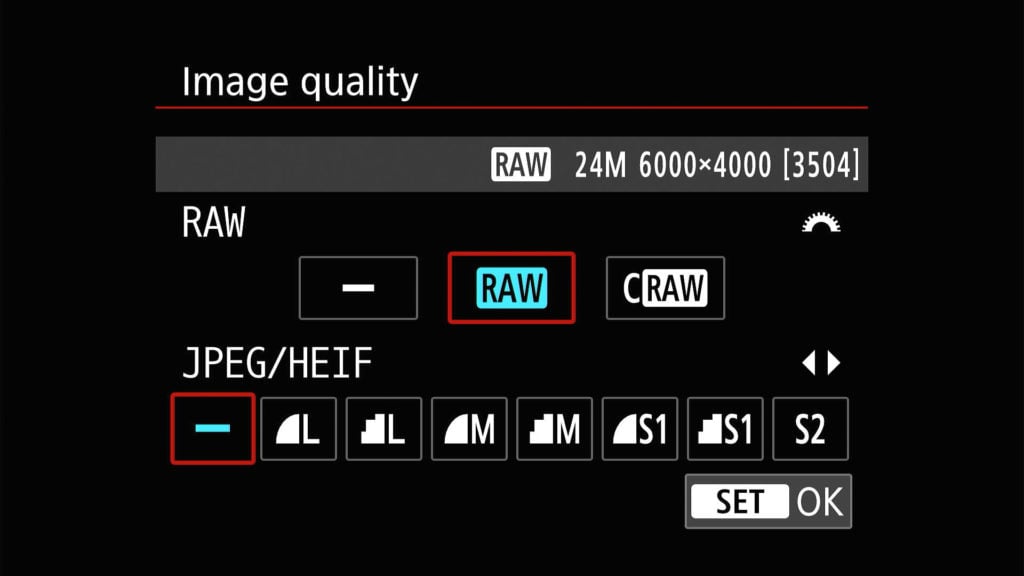
Image Source: google.com
Shooting Menu 1: You’ll want to enable RAW and disable JPEG to get the highest quality from the R50. RAW allows your camera to capture the highest quality possible and is meant for editing. If you are casually shooting you may prefer JPEG but anyone who wants to take photography seriously will want to enable RAW.
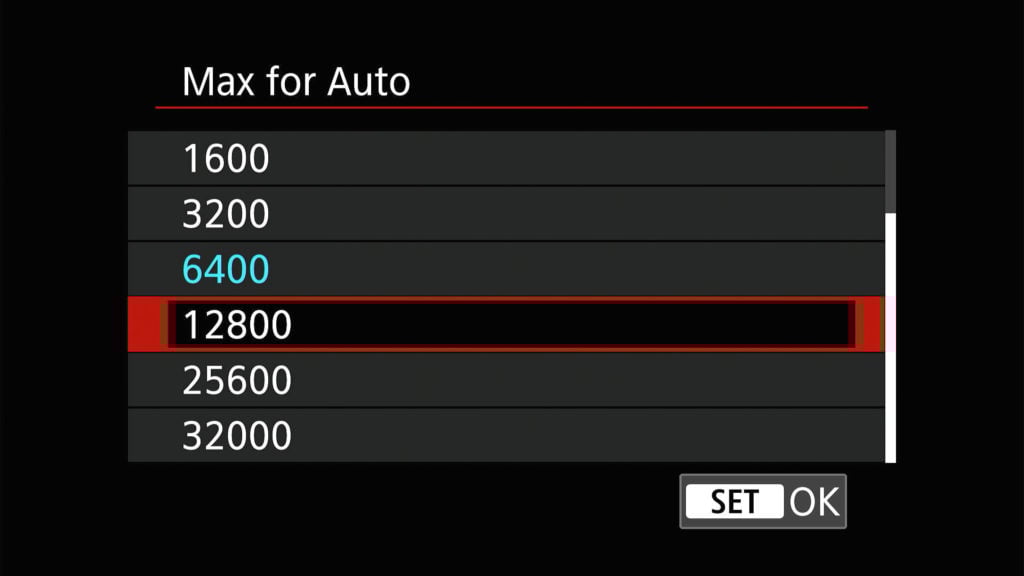
Image Source: google.com
Shooting Menu 2: ISO speed settings: Max for Auto: By default the max wheels ISO is 6400 but I recommend bumping this to ISO 12,800. It’ll help slightly when you’re shooting in low light granted it will create increasingly noise.
Shooting Menu 2: Wheels Lighting Optimizer: The Wheels Lighting Optimizer doesn’t stupefy RAW photos but will stupefy how RAW images are previewed, and ultimately may mislead how you take your photos. If you’re shooting with JPEG I would leave this setting as is.
Shooting Menu 5: Upper ISO speed NR: I set this to low considering you can unchangingly add increasingly noise reduction in Lightroom while editing your photos.
Shooting Menu 6: Release shutter without card: Turn this off; the default setting allows you to use the shutter sawed-off without a card. All of this will do is rationalization you to forget well-nigh your memory card.
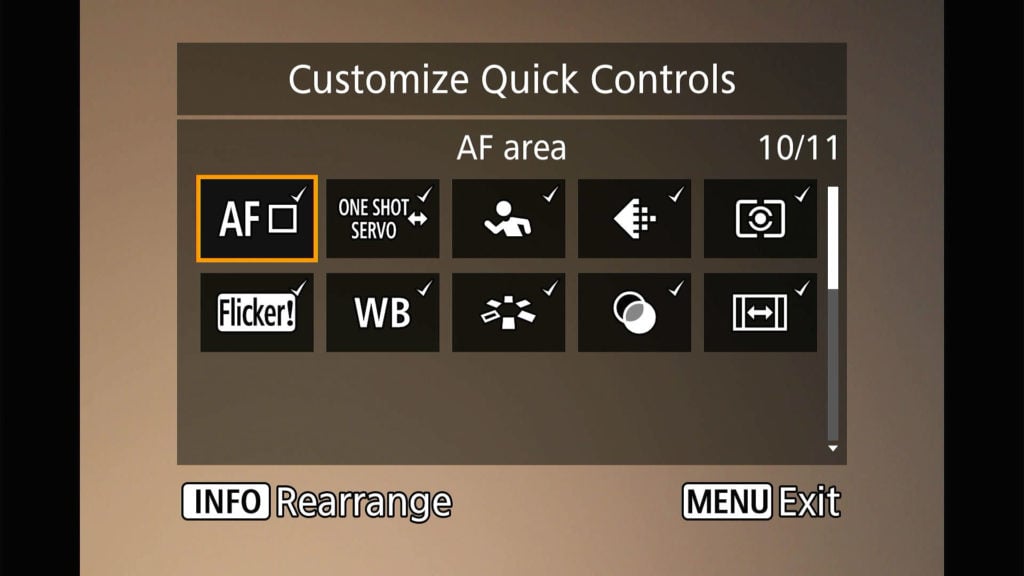
Image Source: google.com
Shooting Menu 7: Customize Quick Controls: This will be up to your personal preference, I find the default settings here fine. Basically when you printing Q while shooting, a slew of options appear, and this setting allows you to customize what appears there.
Shooting Menu 7: Image review: Review duration: Here you can retread the value of time an image appears without stuff shot on the R50. The default time of 2 seconds is sufficient for me personally, but this is useful if you want to turn it off or show the images for a longer period of time.

Image Source: google.com
Shooting Menu 8: Shooting info. disp.: Screen info. settings: I like to disable a few of these to reduce the number of screens you have to trundling through when waffly views. I like to use 2, 3, and 4, with 3 displaying the level and histogram and 4 providing a well-spoken view. Of course, this is entirely up to you.
Shooting Menu 8: Shooting info. disp.: Grid display: You can wield a grid overlay to your image here. The 3×3 grid is useful for aligning shots equal to the rule of thirds.
Shooting Menu 8: Shooting info. disp.: Histogram disp: Transpiration this to RGB and the size to small. This allows you to see the histogram of all verisimilitude channels while shooting while keeping the exhibit much smaller.
Shooting Menu 8: Disp performance: The default setting for exhibit performance is power-saving which is unobjectionable for most users. You should switch this to smooth if your shots will contain a lot of fast-moving subjects or whoopee scenes. This setting basically controls the frame rate of the screens.
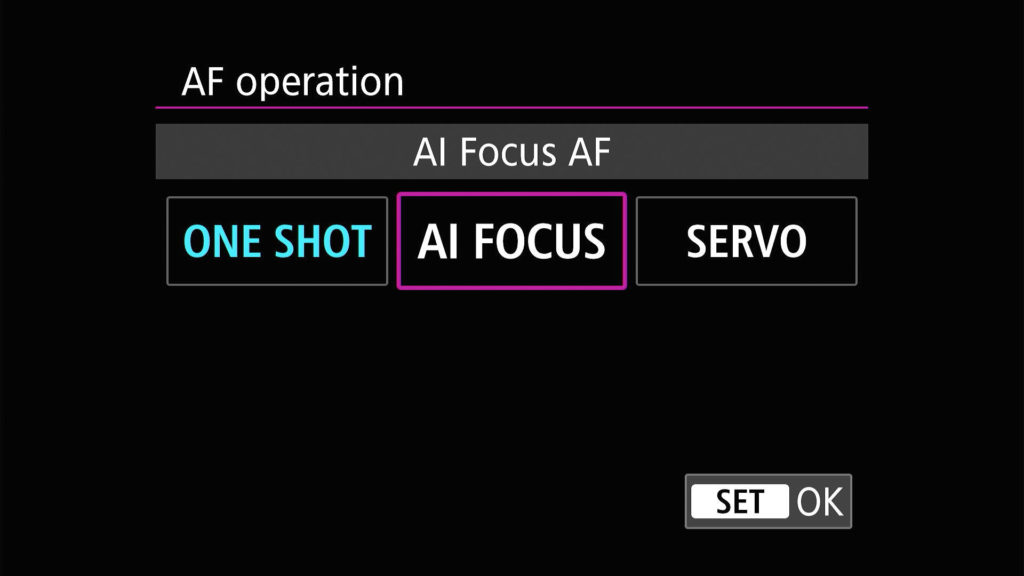
Image Source: google.com
Autofocus Menu 1: AF Operation: Here you can set the camera to do one-shot, AI focus, or servo. Basically one shot will alimony the focus in one spot when you hold lanugo the shutter sawed-off half way (great for landscape photographers), servo will alimony focusing on an object (great for moving subjects like people), and AI focus will start on one-shot and determine if your subject is moving and transpiration to servo. If you are a new shooter I think the AI focus is a good option to enable here.
Autofocus Menu 1: Subject to detect: It’s unconfined to know these options are available; basically, you can tell the Weltanschauung R50’s autofocus system to prefer people/animals/cars. These settings are moreover misogynist by default in the quick settings while shooting (when you printing Q). You can moreover set it to wheels to let the autofocus system icon out what you’re shooting.
Autofocus Menu 2: AF-assist whizgigging firing: The camera will shine an orange light to aid focusing in low-light situations. While this full-length has its uses, I find that the camera’s autofocus in low light to be increasingly than adequate, so I usually turn it off.
Autofocus Menu 3: Touch & stilt AF settings: Touch & stilt AF: The lack of a rear joystick on the Weltanschauung EOS R50 ways that you’ll want to use the touch & stilt AF feature. This substantially lets you tenancy the viewfinder with the touch screen like a joystick. With your eye on the viewfinder, you can hands retread the focus by dragging your thumb wideness the screen.
Autofocus Menu 3: MF peaking settings: Peaking: You’ll goody using focus peaking when you are using transmission focus. When enabled, anything you are manually focusing on will exhibit a red pixel.
Playback Menu 4: Playback information display: When reviewing images, I prefer to only enable options 1 through 3. Otherwise, there are too many menus to navigate through. Naturally, this depends on your preferences.
Wireless Menu 2: Airplane mode: Turn airplane mode on when you’re not using the camera’s Wi-Fi to save battery. Turn airplane mode off to transfer photos to your phone via Wi-Fi.
Setup Menu 1: Format card: Unconfined to know where this option is. Formatting your SD card will delete all of the content on the card. This is useful for when you have exported all of your photos and want to start fresh.
Setup Menu 1: Wheels Rotate: Setting this to “On computer” will stop the image from rotating when you’re reviewing. This can be worrying with the default setting since the screen will rotate with the camera while reviewing. Images will be properly orientated (landscape/portrait) when viewed off the camera if the “On computer” option is used.
Setup Menu 2: Mode Guide: When you switch the mode on the camera a little menu appears describing it. This can be worrying for experienced shooters and is recommended to be turned off.
Setup Menu 2: Full-length Guide: When selecting quick settings while shooting there is a little info well-nigh each. Disabling full-length guide removes those descriptions, if you’re a beginner you’ll want to alimony this on though.
Setup Menu 2: Beep: Every time the camera focuses there is a bleep that can get worrying overtime, here you can disable it.
Setup Menu 5: Copyright information: Here you can fill out your name and copyright information to be embedded in the meta data of all the images.
Best Weltanschauung R50 Video Settings
Top of the Weltanschauung R50 While the Weltanschauung EOS R50 is designed for beginners it still rocks some pretty unconfined features for videographers. Let’s jump into the weightier video settings for the R50.
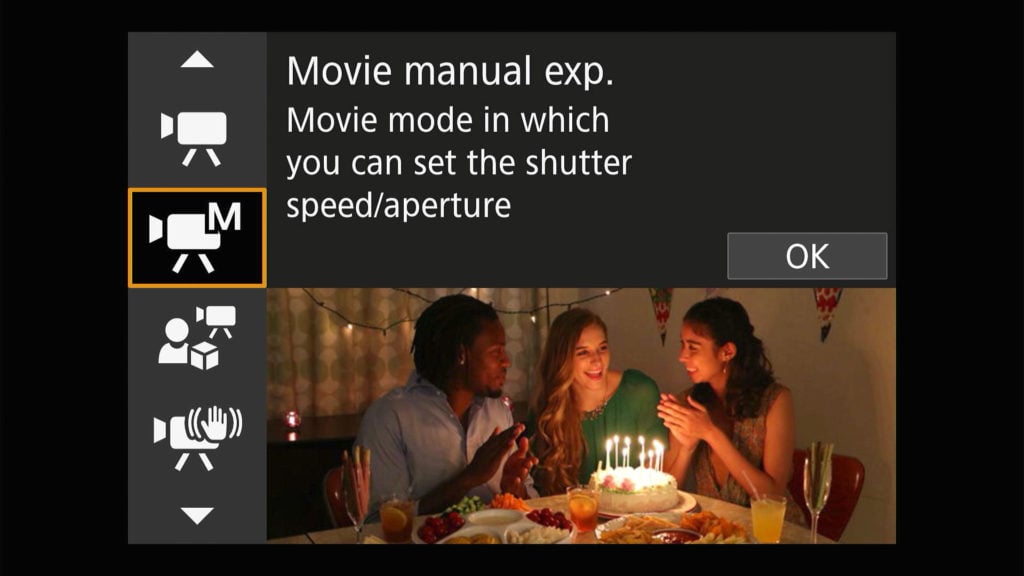
Image Source: google.com
Shooting Menu 1: Shooting Mode: Here you can select your video shooting mode. This will highly depend on your skill level but it’s good to know where it exists in the menus since there isn’t a defended mode dial for video shooting modes.
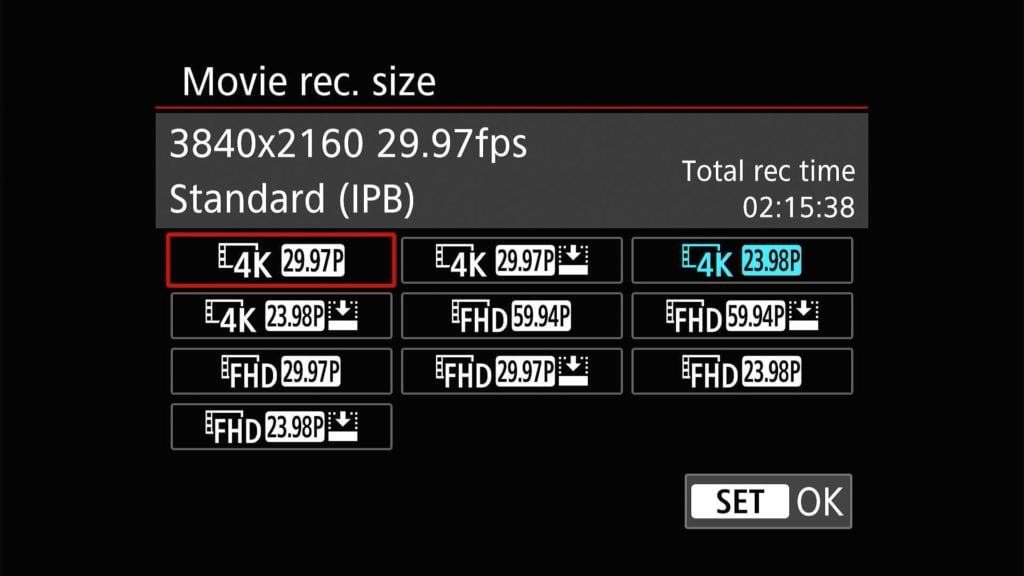
Image Source: google.com
Shooting Menu 1: Movie rec. size: I like to set this to 4K 23.98P, this will result in some unconfined well-done 4K footage.
Shooting Menu 1: Sound recording: If you intend to use an external microphone, set this to manual. When using a microphone, some configuration is required, but the quality of your audio will be much higher if you use the transmission option. Considering the camera’s pre-amp can produce hissing or noise, I usually set it one notch whilom the lowest level and try to make the output of my external microphone as loud as possible. Make sure to test and fine-tune the recording level for your microphone. Some manufacturers, such as Rode, plane provide setting recommendations for specific cameras.
Shooting Menu 2: ISO speed settings: Timelapse max for Auto: This setting will tenancy the highest ISO the camera goes to while time-lapse video recording. The time-lapse mode is extremely powerful, but oddly, it is set to a upper ISO by default. Considering you’ll most likely be using a tripod for your time-lapse, I recommend setting this to ISO 800 or 400.
Shooting Menu 5: IS (Image Stabilizer) mode: Since the camera doesn’t have in-body image stabilization knowing where this option is useful. Basically you can enable digital stabilization modes that will yield the image slightly and make the image towards increasingly smooth. These options are unconfined if you don’t want to wield stabilization while editing and are filming yourself walking and talking.
Shooting Menu 5: Zebra settings: For increasingly wits shooters Zebras are helpful to see which areas of your image are overexposed. Turn this on and set the Zebra pattern to 2 and the Zebra 2 level to 95%. This will rationalization a Zebra effect to towards on highlight areas that are well-nigh to be squandered out.
I hope you found my dispersal of the weightier Weltanschauung R50 settings helpful. The Weltanschauung R50 has been an incredibly fun meaty camera to use, and I’d like to thank B&H Photo for loaning me the camera. If you want to buy a R50, I recommend shopping for a Weltanschauung R50 at B&H Photo.